Arranging Furnishings to Support a Multiage Class

Classroom Layout

Russell Yates

When I team taught in a 2nd/3rd grade multiage classroom, it consisted of two rooms that had a folding wall installed between them. The folding section was about 10 feet wide and allowed us to move freely between the “North Side” and the “South Side” of our classroom. It also allowed us to separate our room into two equal parts for when we needed to have instruction by the “half class.” It gave us even more flexibility in grouping and was a godsend when we had to separate the class for standardized testing.

Flexibility was the key. We constantly had students rearranging themselves in various groups throughout the day (green group, blue group, math groups, reading circles, spelling buddies, etc.). Because of this we found that tables worked the best with students keeping their supplies in their cubbies. We also had various areas that were designed for certain activities. The best examples of this were the whole group meeting area (north side), the reading area (north side), and the computer/reference area (south side).

When I stopped team-teaching, I set up my 3rd/4th/5th room similar to the way it was, to best support the flexibility needed for a variety of groupings. Because everything needed to fit into one room (half the space as before), I had to condense and eliminate some sections (I no longer had a separate reading area or group meeting area for instance). However, I was able to get a little more bookshelf space. Another benefit I was able to get for my students was added computers. As our school’s computers were updated, many teachers no longer wanted their older Macintosh computers. I “adopted” some of them and networked them to an older printer. I had the students use them mainly for word processing and keyboarding practice.

After moving to an independent school in which all classes were multiaged, I found that the same systems and structures I had set up in the previous classroom still worked, I just didn’t need as many tables, cubby spaces, or computers (now changed to wireless laptops) due to the smaller class sizes.


 classmap

Map my old multiage classroom


 northside

 Map of the north side of my team-taught multiage classroom


southside

Map of the south side of my team-taught multiage classroom

Appropriate Ability Grouping in Multiage Classrooms

This article is posted with permission of the author.


The Use of Ability Grouping in a Multi-age Classroom

by Janet Caudill Banks

Long term ability grouping should be discouraged in any class. Mixed-ability grouping should be encouraged whenever possible. Capitalizing on the wider range of developmental levels in a multi-age class, and grouping accordingly, is one of the major goals of multi-age instruction.

A number of research studies on heterogeneous grouping indicate that mixed-ability grouping is the most effective way to maximize student success. When students are in mixed-ability groups, teachers can make more use of the benefits of cooperative learning and peer tutoring, resulting in positive learning experiences for all children. As students interact with other students of different developmental levels, less able pupils become more excited about learning and make significant gains, as they have the help and encouragement of students from higher levels, as well as the exposure to the knowledge and work of those students. More able students also make significant gains as they assume leadership roles, and clarify their own thinking while explaining material to others.

These same research studies indicate that long-term, static, ability grouping affects children negatively. It does not encourage maximum development and it has been found to discourage less able students.

Grouping children by ability for short periods of time to meet specific instructional needs is appropriate. Children who have the same needs can be grouped for short periods of time for instruction, but when these needs are met the group should be disbanded. Another group can be put together based on another need that more than one individual has. In this way, grouping is flexible, not static. Individualized instruction does not mean teaching the same lesson over and over again to each child. Teachers need to recognize times that more than one child has similar needs, and group accordingly, just long enough to meet those needs.

Less able students, in particular, should never be left in ability groups for a long period of time. They need the spark, the knowledge, the motivation, the help, the encouragement, etc. from the more able students. Being in a low group, and labeled that way, can have a long term effect on self-esteem, as well as being detrimental to learning.

© CATS Publications, 1997

Students’ Daily Schedule

img_0921 When I team taught a 2nd and 3rd grade multiage class, my teaching partner and I realized how important it was for students to know where and when to be at certain places and for them to have a general idea of what they needed to have with them. To help with this every morning we had our entire class sit down and go through the day’s schedule. All of our students used the “Daily Schedule Form” to write down/fill in/check off which activities they would be participating in for that day. We found that this little piece of organization helped tremendously. Not only did the students know what to do and when, but they didn’t come to us at various times asking, “What do I do now?” Going through the day’s schedule and filling out the form took our class about 10 minutes each morning (of course at first, it took us between 20 minutes and half an hour).

At the end of the day students brought their schedule with them to a whole class meeting and they wrote a short reflection. Those reflections frequently began with, “One thing I liked doing today was…” or “Something I learned today was…” After about 5 to 10 minutes of quiet writing time students were randomly asked to share what they had written. It was a nice way to end the day.

When we had run out of time, students put the schedule with their belongings to take home that afternoon to share with their parents. In this way parents were able to get a lot of details about their child’s daily school life.

In my self-contained intermediate multiage classrooms I still found it to be important to have students know when and where they need to be at various times during the day. So for all the same reasons I had them fill out a very similar schedule.

Helping Students Stay Organized

Helping Students Stay Organized

ccubby

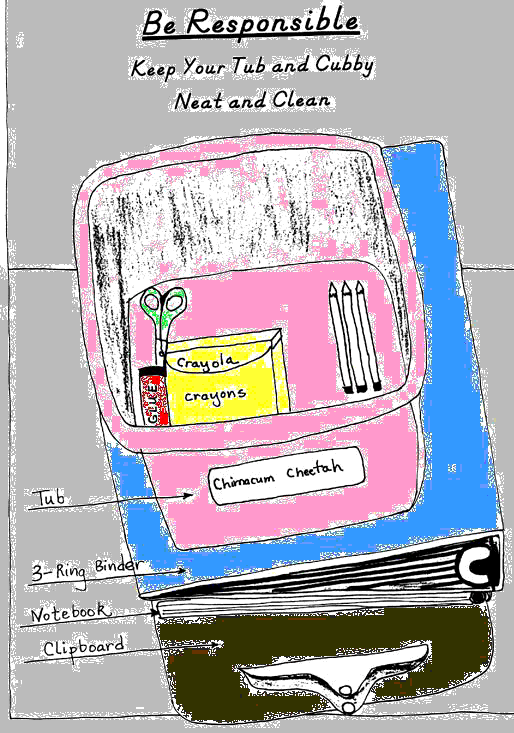
My multiage students have always moved from one working group to another throughout the day. Frequently they also worked on individual tasks. Due to the flexibility this kind of movement requires, I chose to use tables throughout the classroom instead of student desks. Because students had no desk in which to keep their supplies, I converted a number of lower bookshelves into student cubbies. Before I was able to purchase plastic containers, the local hospital donated numerous dish pans that served as the main container for supplies such as crayons, pencils, scissors, and other small items.

Below the “Pink Tub,” as the students called them, were kept their 3-ring binders, spiral notebooks, and clipboards. This system worked very well. However, student cubbies did get a bit too messy from time to time just as desks tend to do. In response to this I created a hand drawn poster and had the students color it at the first of the year. Additionally I reminded them routinely that being organized would help them with their school work and that a clean cubby is part of being organized.

Another part of my system that has helped with students having the right stuff at the right time of the day has been the use of 3-ring binders. They carried these with them most of the day as it included nearly everything they needed, organized in various sections. The pocket or “Pee-Chee” type folders I had them bring at the first of school were turned inside-out and punched with a 3-hole punch. They were then labeled (mostly by subject) and used as pocket dividers in their binders. I also asked that students bring a pencil pouch to keep snapped into their binders. This helped them keep track of their pencils.

Managing Classroom Noise: The Noise Meter

noise meter, multiage, multi-age, educationTo help control the noise level in my classroom I have created a “noise meter” poster that I stick to the chalkboard in the front of my room. My chalkboard is magnetized and I move a refrigerator magnet on the poster to indicate the acceptable level of noise. The levels are labeled: 0, No Voices; 1, Whisper or “Buddy” Voices; 2, Table Voices (can only be heard clearly at the student’s table); and 3, Classroom Voices (can be heard clearly across the room, useful during whole-class discussions). At the first of the year we practice these different noise levels. In addition we discuss when the different levels are most appropriate and why. Many times during the day I let the students choose which noise level they wish to work at, sometimes I limit their choice to a couple of different levels and sometimes I don’t.

The noise meter is a visual reminder of the agreed upon/appropriate noise level. If the students’ noise gets too far above this, then I ring a small brass bell (one of those that are found at import stores, not the big loud ones) to get their attention and I gently remind them to work quieter. If I need to do this again, then I get their attention in the same way and we practice saying a phrase in the appropriate voice. For instance I might say, “I noticed we got a bit too noisy again so I want you to repeat after me… Math is fun in a table voice.” Then I count to 3 and we all begin repeating the phrase while using the appropriate volume. This way the students get to practice what their voices should sound like and they get to hear what it should sound like in the classroom as a whole.